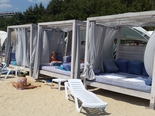
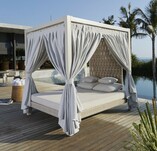
BEACH GAZEBO (PERGOLA)
OF NATURAL WOOD
For a comfortable stay in the fresh air.
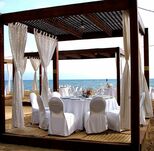
Production and sale of wooden beach gazebos (pergolas) for the beach, hotel, restaurant,
and for individual use on your land plot, cottage or house by the sea.
in the fresh air.
Production and sale of wooden beach gazebos (pergolas) for the beach, hotel, restaurant,
and for individual use on your land plot, cottage or house
by the sea.
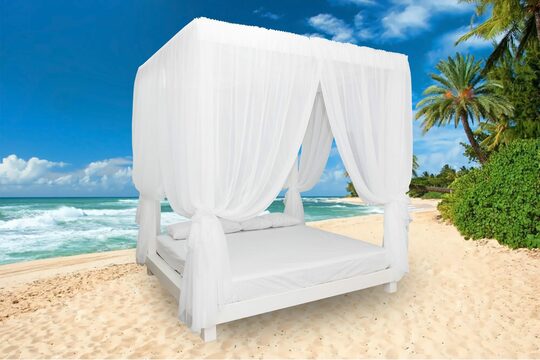
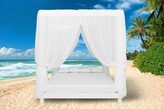
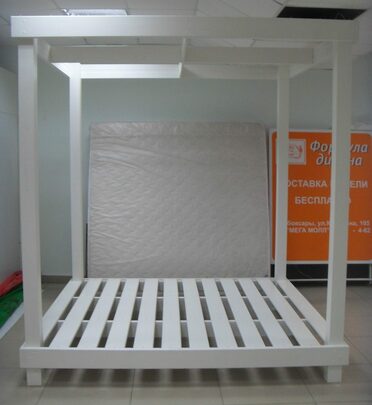
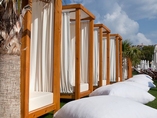
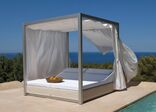
of natural wood "Orion-1"
- for VIP recreation.
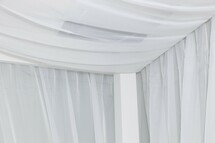
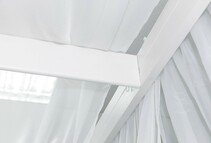
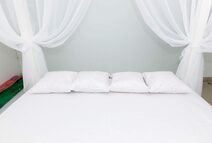
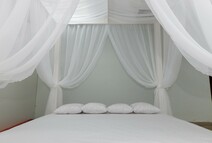
A special canopy protects You from the sun's rays.
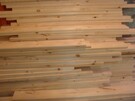
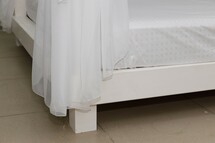
The frame of the gazebo is made of natural wood and painted with eco-friendly German water-acrylic paints.
A soft mattress of 2 by 2 meters will allow you to freely accommodate up to 8 adult vacationers.
A special canopy protects
You from the sun's rays.
The frame of the gazebo is made of natural wood and painted with eco-friendly German
water-acrylic paints.
A soft mattress of 2 by 2 meters will allow you to freely accommodate up to 8 adult vacationers.
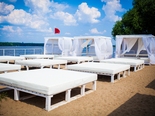
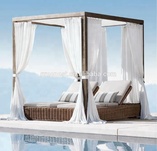
If you are a successful person who has his own plot of land, cottage or house by the sea, then this offer is for you.
or boarding house, If you are a successful person who has his own plot of land,
cottage or house by the sea, then this offer
is for you.
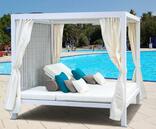
- Destination: For a comfortable outdoor holiday
- Capacity: 4 adults
- Capacity, max.: 320 kg
- Construction material: wood
- Color: White, wenge, natural (and others at the discretion of the Customer)
- Dimensions, mm (length/width/height): 2278/2066/2500 mm.
- Basic: Wooden frame, supports of glued beam
- Spring mattress or polyuritan 2000x2000x210 mm, 1 piece,
- Pillow made of sintepon 500х500 mm, 4 pieces,
- Capron canopy 2000x2000 mm, 1 piece,
- Сapron curtain (veil), 4 pieces,
- Mattress-case removable waterproof 2000х2000х10, 1 piece,
- Removable sheet on a rubber band 2000х2000х10, 1 piece,
- Removable pillowcase 500х500 mm, 4 pieces
- Destination:
For a comfortable outdoor holiday - Capacity: 4 adults
- Capacity, max.: 320 kg
- Construction material: wood
- Color: White, wenge, natural (and others at the discretion of the Customer)
- Dimensions, mm (length/width/height): 2278/2066/2500 mm.
- Basic: Wooden frame, supports of glued beam
(on a separate order):
- Spring mattress or polyuritan 2000x2000x210 mm,
1 piece, - Pillow made of sintepon 500х500 mm,
4 pieces,
- Capron canopy 2000x2000 mm,
1 piece, - Сapron curtain (veil),
4 pieces, - Mattress-case removable waterproof 2000х2000х10,
1 piece, - Removable sheet on a rubber band 2000х2000х10,
1 piece, - Removable pillowcase 500х500 mm,
4 pieces
- Production time: 3 working days
- Delivery: Any available logistics company
- Assembly, installation: No special knowledge required, 2 specialists and build instructions
- Model weight: 3 places - 50 kg., total weight - 150 kg.


EQUIPMENT
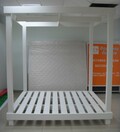
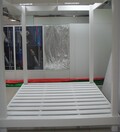
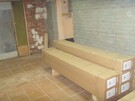
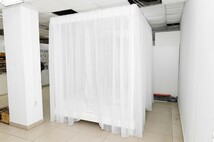
BASIC EQUIPMENT - It is a structure made of wood without mattress, curtains, canopy and sleeping accessories. This is an economical option to purchase a beach gazebo, when you can independently find the necessary option for yourself to arrange a gazebo.
BASIC EQUIPMENT - It is a structure made of wood without mattress, curtains, canopy and sleeping accessories. This is an economical option to purchase
a beach gazebo, when you can independently find the necessary option for yourself to arrange
a gazebo.
supports made of glued beam.
- Proposed colors are white, wenge or natural (lacquer tinted).
- The model of the mattress is a spring, dimensions 2000х2000х210mm. and a change sheet of teak on a rubber band.
- Pillow made of sintepon 500х500 mm, 4 pieces, as well as pillowcases made of teak in the color of the gazebo.
On the sheets and pillowcases on your order, we will be able to embroider your logo.
As well on your order, we will offer you a replacement waterproof mattress-case.


Diplomat of the exhibition
"Spring in the country house - 2020"
"Spring in the country
house - 2020"
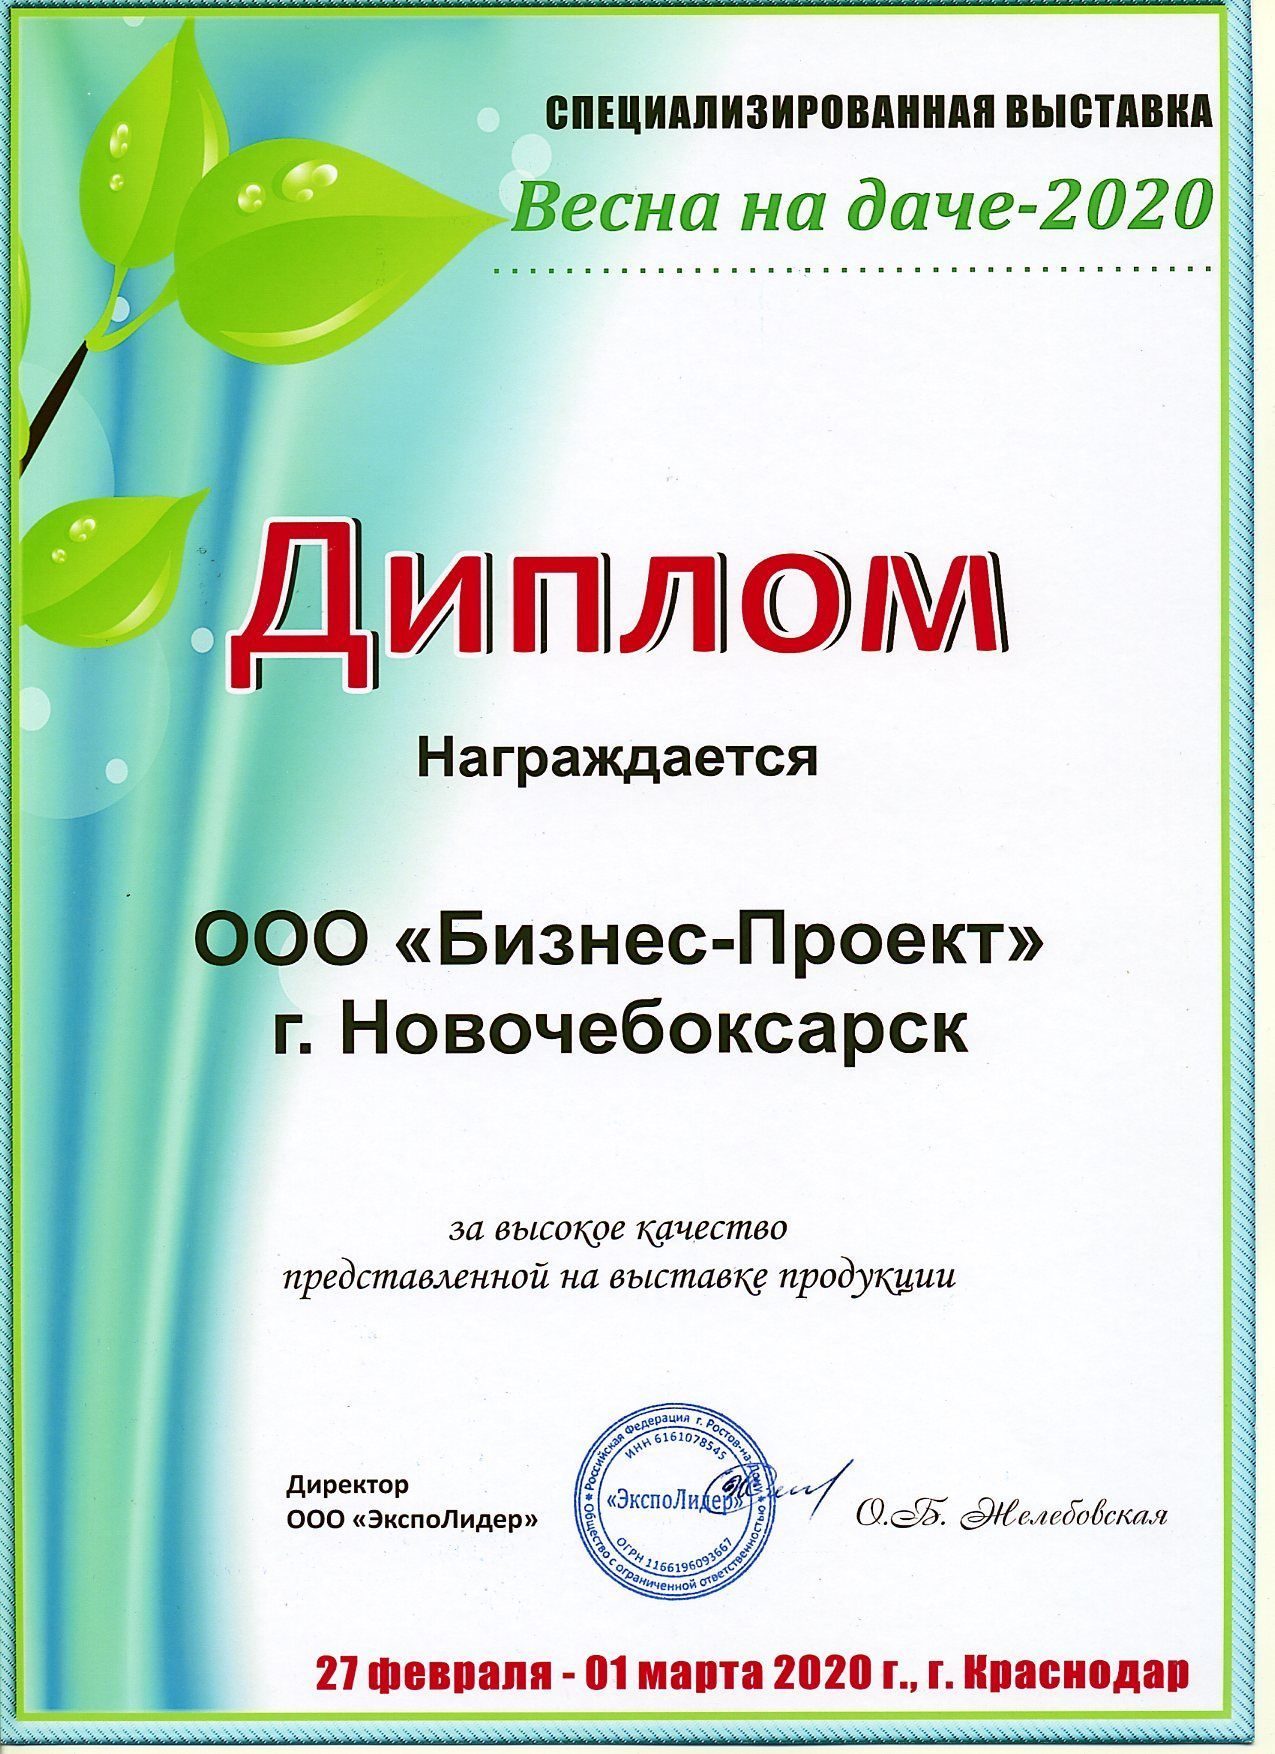
exhibited in Krasnodar in March 2020
and won a Diploma in the category:
Landscape design and landscaping
- small architectural forms and garden sculpture,
benches, gazebos, tents, canopy, pergola
ADVANTAGES

High-quality
wood
We choose the best breeds of wood for you

Exquisite
design
You can admire the picturesque landscapes

Provides convenience
Creates comfort zones
and privacy

Looks
stylish and easy
Every element
looks harmonious

Mobile
in space
You can position the gazebo in any place you want

Fast montage,
assembly and disassembly
2 people and assembly instructions / Easy to understand for storage for the winter

Long life
The gazebo will serve you for many years and will bring a lot of pleasant emotions
INSTRUCTIONS AND SPECIFICATION
AND SPECIFICATION
Video Assembly instructions
Photo of the gazebo "Orion-1"


and get a detailed presentation about our product,
price list with wholesale prices and discount on the 1st order up to 15%!
price list with wholesale prices and discount on the 1st order up to 15%!
and get a detailed presentation about our product,
price list with wholesale prices and discount on the 1st order up to 15%!
REVIEWS


PAYMENT METHODS


OUR ADDRESS
LLC "Business - Project"
Vinokurova 48
Novocheboksarsk
Chuvash republic
429959
Russia
Е-mail: zkd.orion@gmail.com


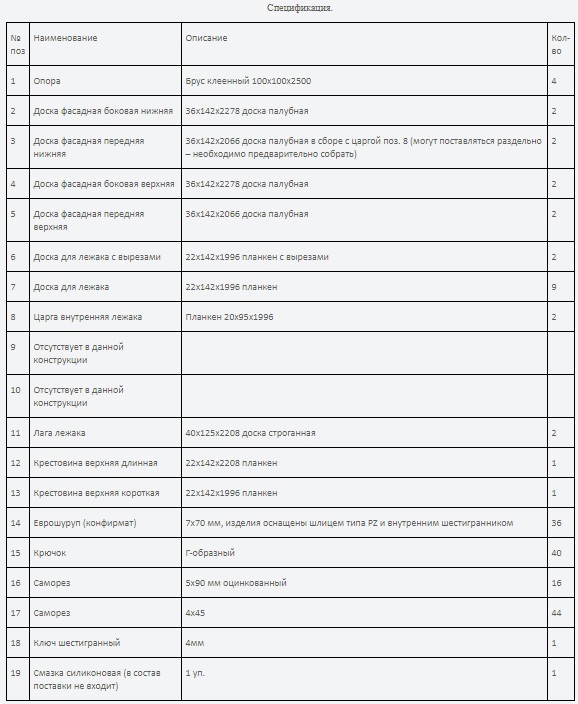
Specification.
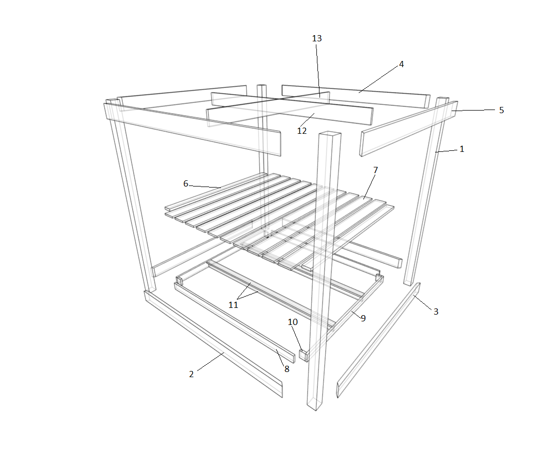
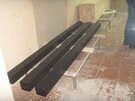
1. Support - (glued laminated timber 100x10 x2500) - 4 pieces.
2. The board is frontal side bottom (36х142х2278 deck board) - 2 pieces.
3. The front lower facade board (36х142х2066 deck board in the collection with side-bar (position 8) (can be delivered separately - it is necessary to pre-assemble) - 2 pieces.
4. The board is front side upper (36х142х2278 deck board) - 2 pieces.
5. Front upper facade board (36х142х2066 deck board) - 2 pieces.
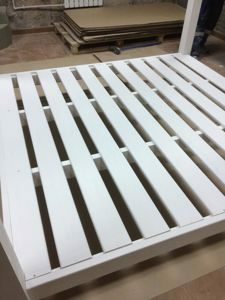
6. Sunbed board with cutouts (22х142х1996 planken with cutouts) - 2 pieces.
7. Sunbed board (22х142х1996 planken) - 9 pieces.
8. Sunbed side-bar Inner (planken 20х95х1996) - 2 pieces.
9. Missing from this design
10. Missing from this design
11. Laga sunbed (40х125х2208 доска строганная) - 2 pieces.
12. Cross top long (22х142х2208 planken) - 1 piece.
13. Cross top short (22х142х1996 planken) - 1 piece.
14. Euroshurup (7х70 mm, the products are equipped with a PZ-type slot and an internal hexagon) - 36 pieces.
15. Hook (L-shaped) - 40 pieces.
16. Screws (5х90 mm galvanized) - 16 pieces.
17. Screws (4х45) - 44 pieces.
18. Hexagonal key (4 mm) - 1piece.
19. Silicone lubricant (it is not part of the delivery) - 1 pack.
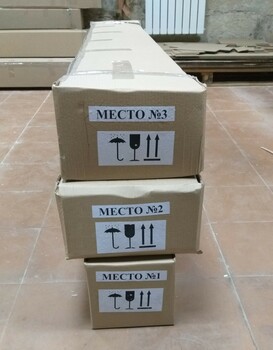
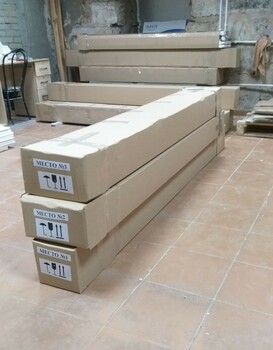
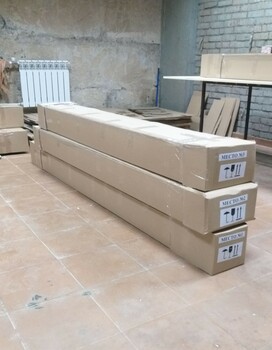
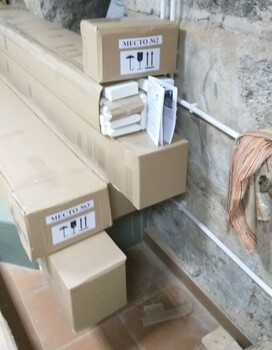
- Place №1 - 210х210х2510 (0,11 cbm) - 46 kg.
- Place №2 - 450х300х2280 (0,31 cbm) - 45 kg.
- Place №3 - 400х300х2070 (0,25 cbm) - 42 kg.
Total: 0.67 cbm - 133 kg.
"Spring at the country house 2020" - 7th exhibition-fair for gardeners.
February 27 - March 1, 2020 Russia, Krasnodar, Sipovskaya Street, 5, VC "КубаньЭКСПОЦЕНТР"
Spring is the busiest time of the year for gardeners. Spring is a time of planting, setting up a country house and a plot after winter. The main task of the exhibition-fair "Spring in the country" - to help people to grow a decent harvest, using the goods and services presented at the exhibition.
The theme of the fair covers the whole range of interests of the owners of cottages and homesteads. Seedlings of ornamental and garden trees, seeds of new and promising varieties can not only be seen and bought at the exhibition, but also get qualified advice on caring for them.
Leading domestic producers, numerous farms, and nurseries became regular participants of the fair.
Country house, vegetable garden, manor:
- Seedlings, ornamental plants, seeds, planting material
- Flowers are roomy and perennial
- Garden tool, equipment
- Fertilizers, fertilization and plant protection
- Metal structures, gazebos, greenhouses, shelter material
- Artificial irrigation and irrigation systems, soil drainage
- Decorative ceramics, glass, porcelain, plastic, wicker products
Landscape design and landscaping:
- Gardening equipment
- Small architectural forms and garden sculpture, benches, gazebos, awnings, sheds, pergola
- Decorative ponds, fountains, waterfalls
- Alpine hill
- Stationary and mobile mini-pools
- Watering, drainage, garden and pool lighting
- Art forging and casting
- Woodwork
- Garden furniture
- Items of country rest
Harvest:
- Farm products
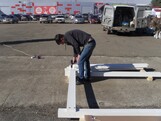
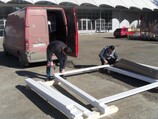
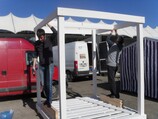
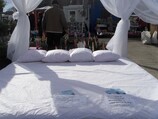
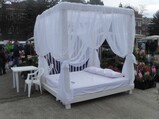
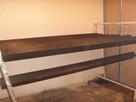
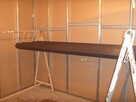
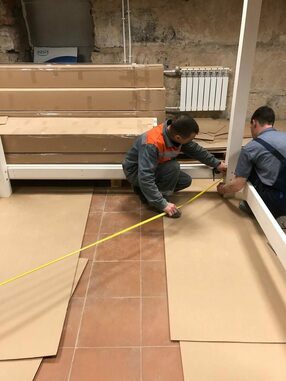
Photo-instructions for assembling a pergola beach model "Orion - 1" (screw connection)


Video instruction on assembling a pergola of the beach "Orion - 1" (mortice and screw connection)
Instruction on assembling a pergola of the beach "Orion - 1" (mortice and screw connection)
1. Purpose of the gazebo
Attention! The manufacturer reserves the right to make changes to the design of the gazebo.
Dimensions, mm (length/width/height) 2278/2066/2500
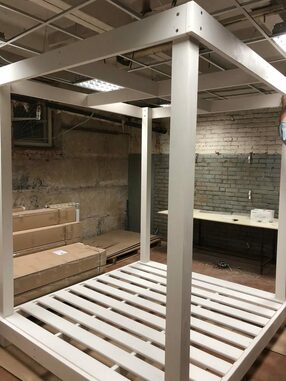
The gazebo beach (pergola) model "Orion-1" is designed to relax people in a horizontal position with the help of an additional mattress for a time of no more than 12 hours a day in the fresh air.
Warning: the use of the gazebo should be carried out only as intended.
2. Transportation and storage rules
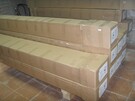
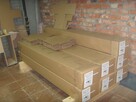
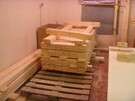
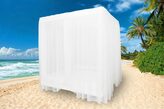
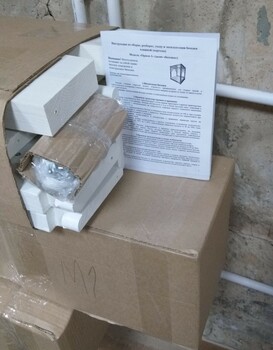
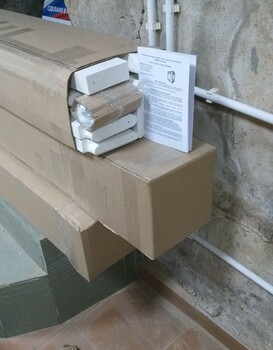
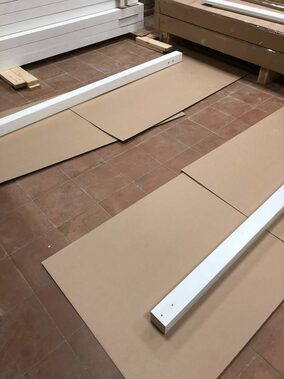
The gazebo is transported in disassembled form by all modes of transport in covered vehicles, as well as in containers. The gazebo is delivered in 2 or more cargo seats, packed in cardboard packaging with labels on the surface of the packaging of each set of inscriptions
Place 1 and Place 2, etc.
(It is allowed to transport the gazebo in the collected form to a distance of up to 100 m. provided that the gazebo is protected from damage and distortions. The minimum number of carriers during such transport is 4 people.)
Transportation is carried out in accordance with the rules of transport of goods on the appropriate transport.
Storage of the gazebo should be carried out in the indoor premises of the sender (buyer). Storage temperatures range from -30°С to 50°С, and relative humidity range from 45 to 70%. The shelf life is 12 months.
Warning: the details of the gazebo damaged during the transportation process are not subject to warranty repair or replacement. After delivery of the pergola in winter (period with negative temperatures), before assembly should be allowed to warm up the packaged kits during the day
and more at plus temperatures in a horizontal position.
3. Rules for the operation and care of the gazebo.
The safety of the gazebo depends on the maintenance of the conditions of storage, operation and care.
Exploitation of the gazebo is possible both indoors and outdoors.
The operating temperature ranges from -10°С to 50°С, and the relative humidity is 45 to 90%.
The gazebo should be installed on a flat, dense surface. If the surface is loose, then under the support of the gazebo to lay solid stands (pieces of boards, stones, bricks, metal plates).
Surface slope to install a pergola of 5° max.
It is not recommended to put hot and wet objects on the surface of the gazebo. It is necessary to protect the surfaces of the pergola from solvents (such as gasoline, acetone, etc.), acids and alkaline. If hit immediately, wipe the surface with a damp cloth and dry.
Protect the surface of the gazebo from mechanical damage: scratches, cuts, blows and dents.
If they are applied, paint with water-acrylic paint of the appropriate color.
Warning: It is forbidden to install a gazebo near an open fire closer than 2 meters.
It is forbidden to install a gazebo on a damp surface (puddles and open water).
Before you start use, make sure that the elements of the gazebo are secure
and a sustainable installation.
4. Preparing for assembly.
Read this instruction carefully.
Unpacking sets of places, assembling items and parts according to instructions and scheme,
determine the availability of the necessary fittings.
Prepare the necessary tool for installation work: screwdriver, roulette, hammer,
wrench, etc.
To avoid damage to the facade edges and surfaces, the assembly is done with caution, using the lining of the packaging material (cardboard).
5. Build a pergola
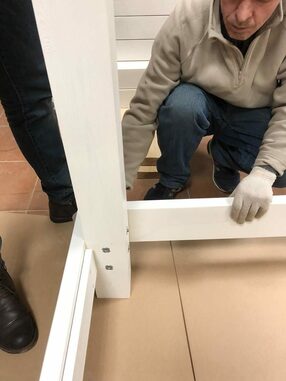
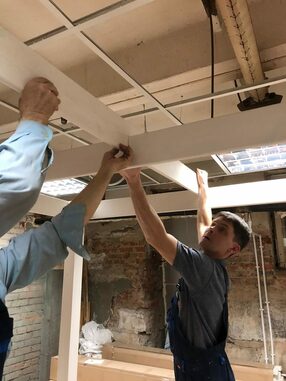
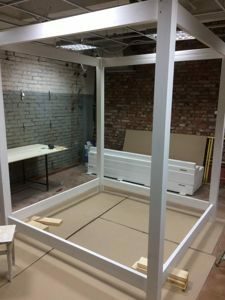
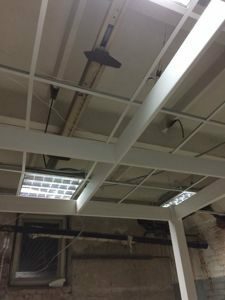
Warning: the assembly is carried out by at least 3 safety specialists for this type of work.
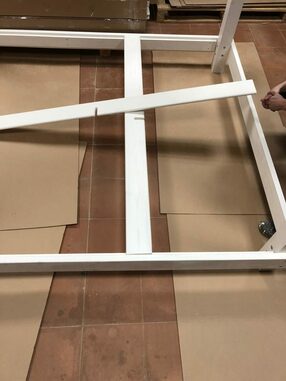
Drawing 1. Pergola beach (pergola) model "Orion-1". Construction device.
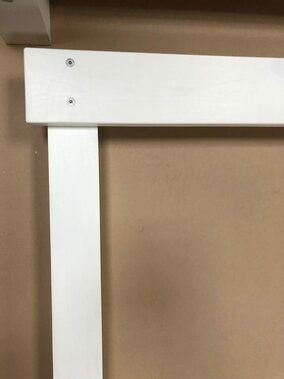
1. Lay out 2 supports (position 1) at a distance of 2 m from each other. Landmark support: the bottom where the grooves are located at a distance from the edge of the support cut more than at the top.
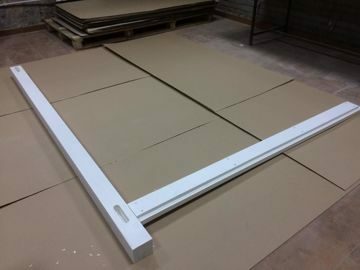
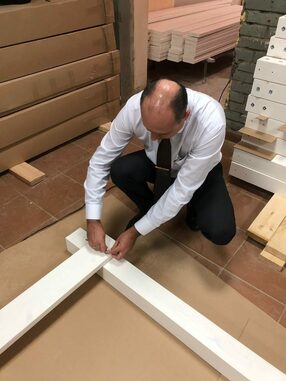
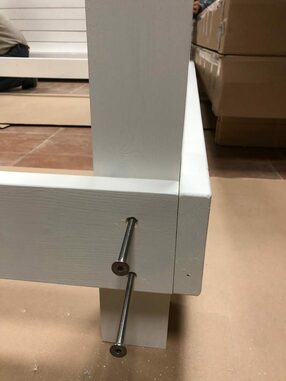
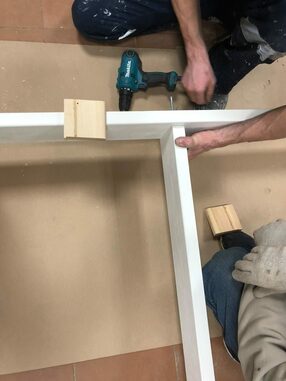
2. Place on the surface of the supports cross facade board (position 3) and the top facade board (position 5). Insert with the help of longitudinal effort of the hands the bottom facade (position 3) and the board top facade (position 5) in the grooves of the supports (position 1) according to the scheme and Photo 1 and Photo 2. Pre-smear with a thin layer of silicone grease of the wall of grooves on the support and spools on the facade board.

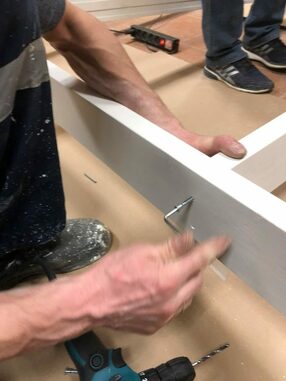
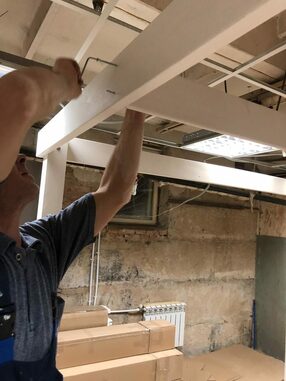
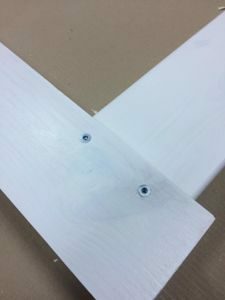
3. Insert screws into the holes of the support and with the help of a cross screwdriver (it is not included in the stand), tighten the screws 5.80 mm (position 16) in the amount of 2 pieces, which would fix the board in the support. In the upper facade boards through the holes in the support (position 1) are inserted Euroshurups (confimants) (position 14) in the amount of 2 pieces with the help of the hexagonal key (position 18) as shown in Photo 3.
4. Collect similarly two other supports. We get two paired supports, fastened with each other facade boards.
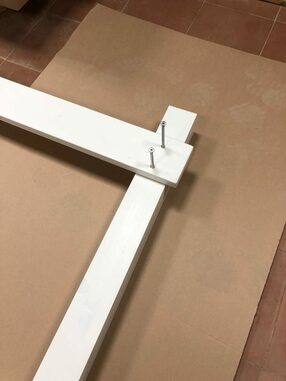
5. Prepare 2 boards of frontal bottom side (position2) and 2 boards front upper side (position 4).
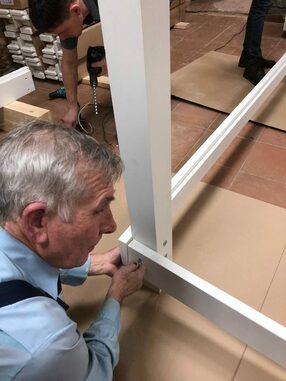
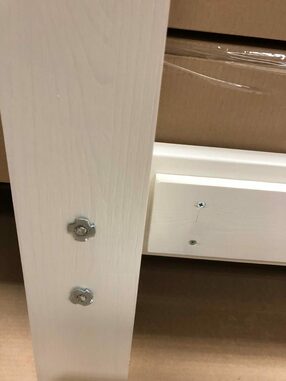
Attention! You need to make sure of that before the next step of the build. If side-bar (frame connecting the legs of a table or chair) is not installed - set side-bar. Each board has a frontal lower side (position 2) to be installed side-bar (position 8) with the help of 4 x45 mm cutters and a cross screwdriver. Holes in side-bar are already scheduled.
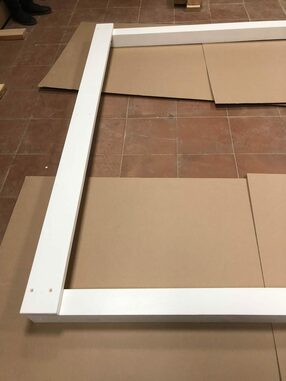
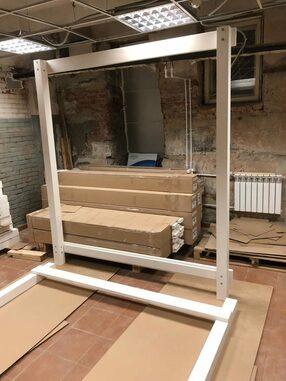
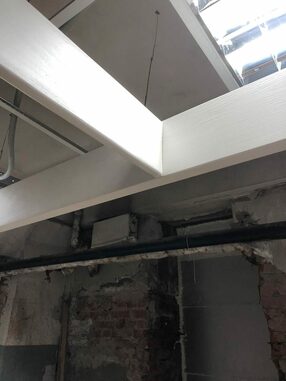
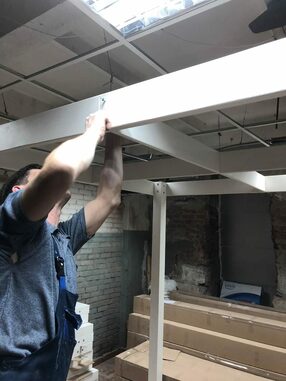
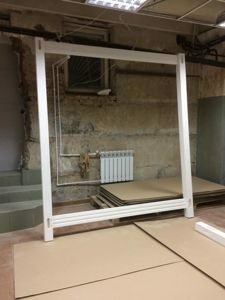
6. With the help of another specialist, lift the paired structure of the supports and install vertically as shown in Photo 4.
7. Insert with the help of longitudinal effort of the hands the facade of the lower side (position 2) and the board of the upper front side (position 4) in the grooves of the supports (position 1) according to the scheme and Photo 5 and Photo 6. Pre-smear with a thin layer of silicone lubricant (position 19) of the groove walls on the support and spools on the facade board.
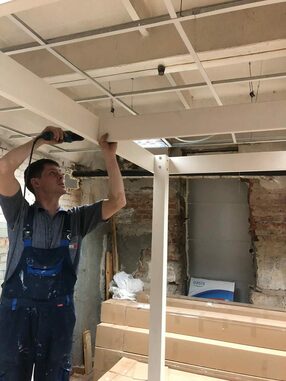
8. Insert the screws into the holes of the support1 and use a cross screwdriver (it is not included in the delivery) tighten the screws 5 x80 mm (position16) in the amount of 2 pieces to fasten the board in support.
Euro-pillars(confirmat screw) are inserted into the upper facade boards through the holes in the support (position 1) (confirmat screw) (position 14) in the amount of 2 pieces using a hexagonal key (position 18).
Check the straight corners between each face of the support1 and the boards facing around the perimeter of the gazebo. Deviations allowed ± 1°. If the deviations exceed the tolerance - to carry out adjustment.
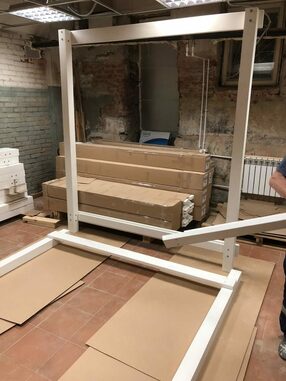
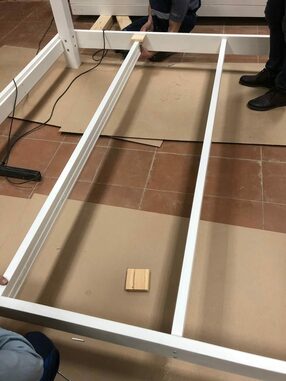
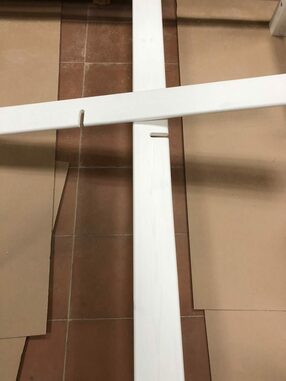
9. Install a sequential lague (2 pieces) of the sunbed (position 11) between the front-facing bottom boards (position 2) and through the holes in the facade board and the ends of the lags to pull off the Euroshurups (confirmat screw) (position 14) in the amount of 2 pieces using a hexagonal key (position 18) as on Photo 7.
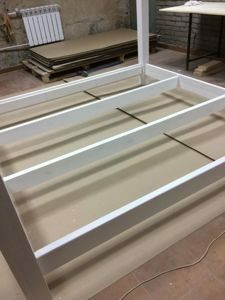
10. Set sequentially (2 pieces) of the cross (position 12) between the boards of the facade top (position 4 and 5), and through the holes in the facade board and the ends of the crosses to pull off the Euroshurups (confirmat screw) (position 14) in the amount of 2 pieces using a hexagonal key (position 18) as on Photo 8.
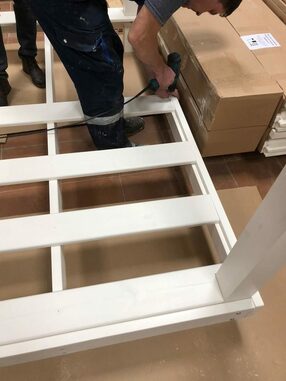
11. Set consecutively extreme (left and right) 2 sunbed boards (position 7) ends on side-bar (position 8) across the lag sunbed (position 11). Fasten the 4 x45 screws (position 17) with a cross screwdriver (it is not included in the delivery) in the amount of 4 pieces. The others 7 sunbed boards are evenly distributed along the length of the gazebo at regular intervals and fixed with 4x45 screws (position 17) using a cross screwdriver (it is not included in the delivery) in the amount of 4 pieces on each board (Photo 9).
The gazebo is complete. Check the product for stability and stiffness with a slight wobble of the pergola.
Wipe lightly with a moisturized soft cloth and can be used.
6. Manufacturer's guarantees.
The manufacturer guarantees that the gazebo meets the safety requirements under the conditions of transportation, storage, assembly (when delivered disassembled), and operation.
If these conditions are violated, the manufacturer's warranty does not apply.
In case of mechanical damage that occurs during transportation, storage, assembly, the manufacturer is not responsible for installation and operation of the gazebo.
Application option:

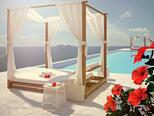
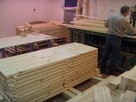
Photos from production